Mobile Learning with iPads
Like most of the world, our TEA Fellows were interested in mobile learning and tablet computers. Specifically, they were interested in the iPad. Several of our workshops spent significant time working with the iPads, looking at apps, learning the interface, and searching for ways to allow their students to use the iPad in active learning. We recognize that it may be some time before the Fellows will have access to the technology at their home schools, but still, we wanted them to experience mobile learning, and how to use these technologies with engaged learning strategies. To do this, we combined an inexpensive microscope with the iPad to demonstrate some techniques.
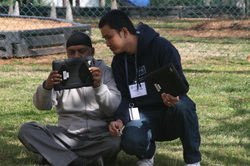
When the Fellows entered the room, small boxes containing the microscopes were lining a table. On another table were a variety of objects. Leaves, sticks, rocks, moss and a host of other elements were available on the table. The Fellows were instructed to get a box, open it, and figure out how the device in the box related to the elements on the table.
We purchased an inexpensive microscope for each of the TEA Fellows. These hobbyist microscopes are small, inexpensive (between $2-$5 depending on the season), and have a remarkably powerful magnification. These are not cellular level devices to be sure, but you can see the detail in a plant stamen, or the fibers in leaves. We also attach these microscopes to devices that have a fixed focal length single aperture camera, such as those on a mobile phone, iPad, or other tablet. We use putty to attach the microscope to the lens. It is a low tech solution to get two pieces of technology working together. Fellows leave the classroom to explore the outside world with their cameras and microscopes. They take pictures on their mobile device, and then transfer them to the computer to edit, and remix into digital projects.
This helps us to demonstrate two very important techniques. The first is to get the technology into the students’ hands. Let them explore, collect data, and then use that data to manifest learning with digital tools. The second is to expand the classroom. To get out of the four walls and into the real world. It is a technique/strategy that promotes problem based learning. Two pieces of multimedia are below.
- A video created on the day of the workshop where we introduced the microscope.
- A photo gallery of images during the lesson and some pictures that were taken using the microscope and iPad.